When users open an Android app, what they see is the result of Android developers assigning data from various inputs (databases, the internet, etc.) to elements of the app user interface. Until 2015, the process of assigning (or “binding”) data toxx UI elements was tedious and potentially messy. During its I/O developer conference that year, however, Google demonstrated its Data Binding Library, which gave developers the ability to streamline and clean up the process in many ways.
When the Library was Beta-released later that fall, I was eager to learn more about Android data binding and its applications, but it was still in its infancy and Google’s disclaimer warned against trusting it in any released app. Fast forward two years to today, and the Android Data Binding Library has matured considerably. The disclaimer is now gone, and I recently began exploring data binding in my daily development work.
Like any good Android developer, one of my main goals is to write clean code, code that “never obscures the designer’s intent but rather is full of crisp abstractions and straightforward lines of control,” as author Grady Booch put it. I have found that using data binding with the Model-View-ViewModel (MVVM) architectural pattern and RecyclerView accomplishes many of the objectives of clean coding, including reducing the requirement for boilerplate code, facilitating code decoupling and improving readability and testability—not to mention reducing development time.
Unfortunately, Google’s examples of using data binding in Android apps are rather simplistic and lack detail. So let’s explore the necessary steps to set up a project with data binding, a RecyclerView and MVVM—and write clean code in the process.
A Quick MVVM Primer / Refresher
MVVM is an architectural pattern that was created to simplify user interface programming. Google appears to be encouraging the use of MVVM for data binding. In fact, the Architecture Components of its Data Binding Library are modeled on the MVVM pattern.
The main components of MVVM are the Model, View and ViewModel, and its structure essentially supports two-way data binding between the latter two.
- The View defines the user interface structure, layout and design and consists of views, layouts, scroll listeners and so on. It also notifies the ViewModel about different actions.
- The ViewModel serves as the intermediary between the View and the Model. It provides data to the View via bindings and handles View logic. It calls methods on the Model, provides the Model’s data to the View and notifies the View of updates.
- The Model is the data domain model and the source of application logic and rules. It provides data to the ViewModel and can update the ViewModel using notification mechanisms such as data access objects, models, repositories and gateways.
As you can see, the View knows about the ViewModel and the ViewModel knows about the Model. The Model, however, doesn’t know about the ViewModel and the ViewModel doesn’t know—or care—about the View. This separation enables each component to grow independently, and this design pattern makes the user interface distinct from the corresponding business logic. The result is easier application development, testing and maintenance.
Data Binding with MVVM and RecyclerView
Follow the steps below to set up Android data binding using MVVM and RecyclerView.
1. Update the Gradle File(s)
The first step in adding data binding to a project is changing the module’s build.gradle file(s). Recent updates to the Android Data Binding Library have enabled easier data binding by adding a data binding closure to the Android closure, and because data binding is included in Google’s Application and Library plugins you no longer need to add a dependency. Instead, use the following closure:
2. Prepare Your Tags
To use data binding in Layout Files, you must wrap the normal View Groups or Views in <layout> tags containing data tags with variables for bindable methods and binding adapters. Bindable methods are typically referenced with app:data="@{viewModel.data}", where the “viewModel” variable is the ViewModel, set on the binding (more on that later).
To reference the bindable method annotated with @Bindable, you only need to specify viewModel.data. You can still access methods not annotated with @Bindable by using the full method name, such as viewModel.getData. As seen below, to set up a RecyclerView with data binding, just add a method reference from which to acquire the data.
RecyclerView Adapter Item Layout File

3. Set Up the ViewModel
The way you set up and use data binding is similar for both activities and fragments. Depending on the application’s need for the context, UI and lifecycle, you can reference the ViewModel by inflating and binding the View with the data binding library or by inflating it independently and binding to it with the library.
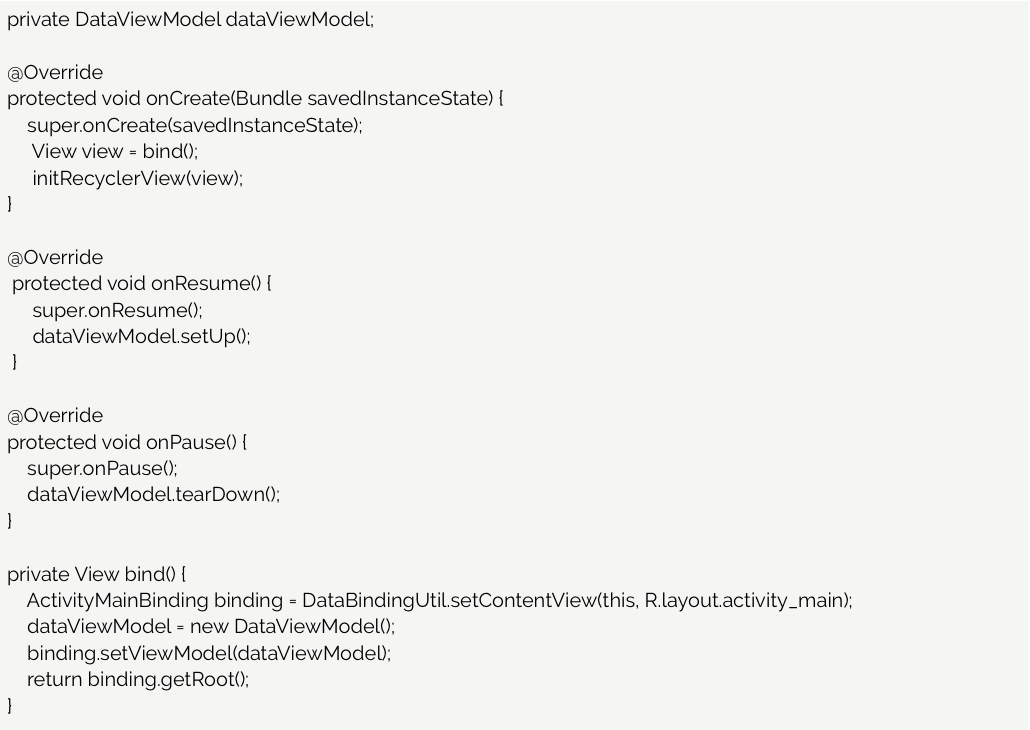
Next, call the appropriate ViewModel methods from the UI. One way to instantiate the binding is to use the DataBindingUtil’s setContentView method. Calling the binding’s setViewModel method sets the ViewModel variable reference, named “viewModel,” as depicted here:
4. Implement the Adapter
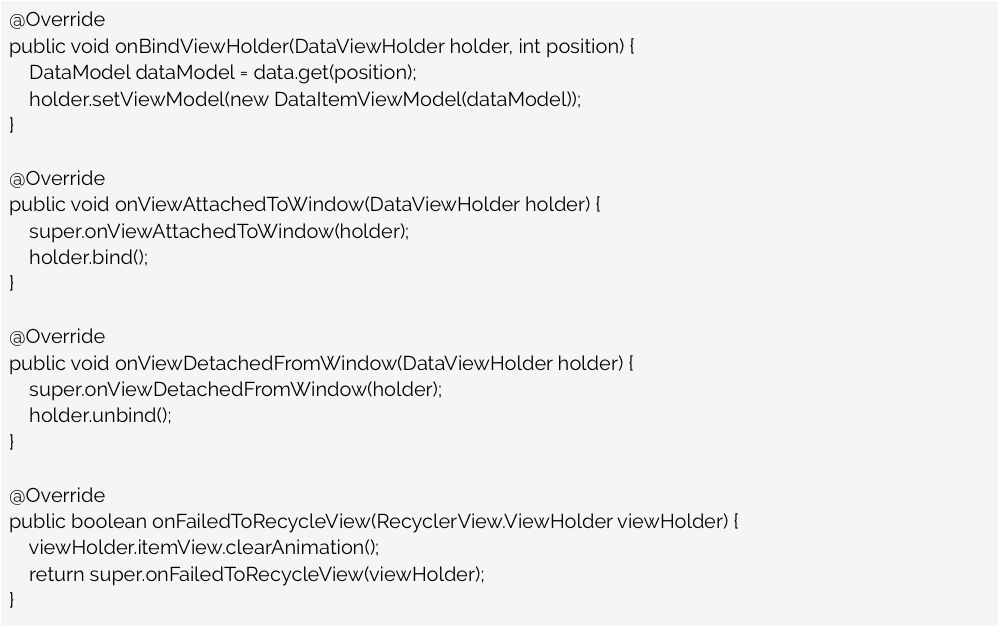
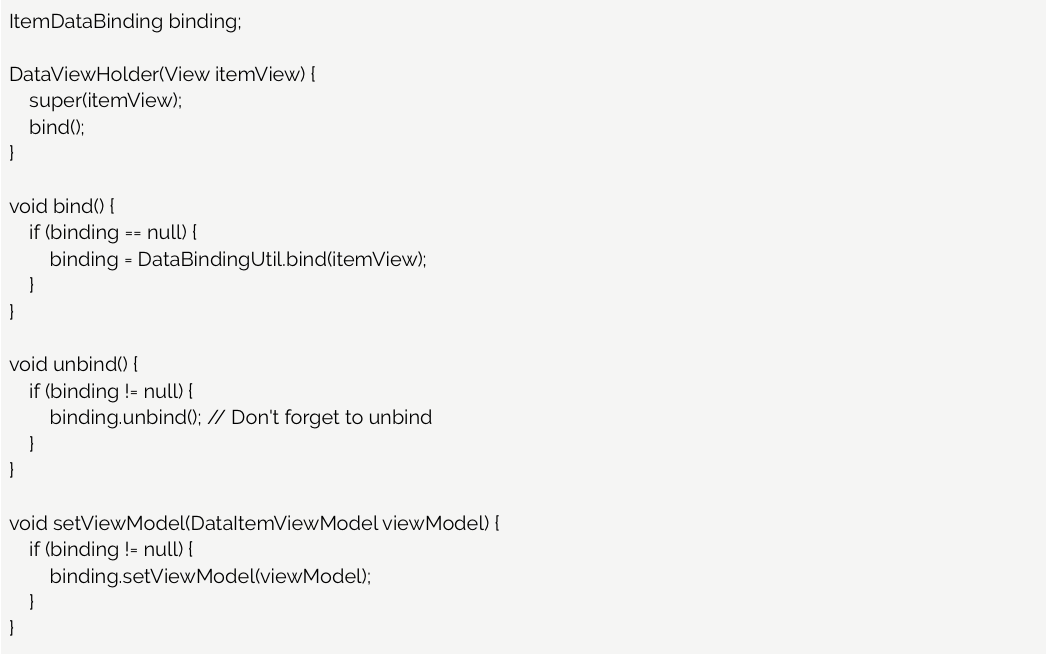
When implementing the Adapter, the ViewModel needs to be set for the ViewHolder, binding and unbinding of the View. A lot of online examples don’t show unbinding the View, but it should be done to prevent problems.
5. Notify the Adapter for Data Set Changes
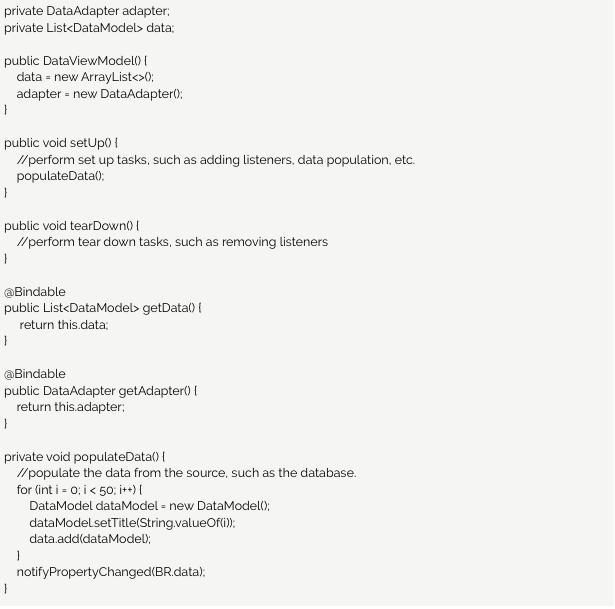
In this ViewModel, the data (items) are made available via the method getData(). When you need to notify the Adapter for data set changes, call notifyPropertyChanged(int) instead of calling notifyChange() (which would notify changes for all of the properties and likely cause issues).
6. Update the Method
This binding adapter method is the other part of the glue to update data in the Adapter. In the MVVM pattern chart, the ViewModel notifies the View of property changes by calling this method. Attribute data is referenced as app:data="@{viewModel.data}" and ViewModel.data references method getData, annotated with @Bindable. When combined with the call to notifyPropertyChanged(BR.data), this reference calls the RecyclerViewDataBinding.bind(RecyclerView, DataAdapter, List
DataItemViewModel : BaseObservable

7. Set the Default Component
To reuse data binding code among multiple classes, set your data binding component as the default component as shown below.
8. Set Your Data Binding Class Accessor Methods
The data binding library requires classes using the @BindingAdapter annotation to have associated “get” accessor methods.
AppDataBindingComponent : android.databinding.DataBindingComponent

9. Set the Adapter on RecyclerView
This is where you can set the Adapter on RecyclerView and where adapter updates occur.
10. Click Event Handling
When a click event results in handling data accessible in the ViewModel, the best approach is to set the onClick attribute on the View in the bindable layout with android:onClick="@{viewModel::onClick.}" specified for the View. The ViewModel must have onClick(View) method implemented to handle the click event.
Tips for Keeping Your Code Clean
Some final tips from the trenches for Android data binding:
- Making extra calls to notifyPropertyChanged(BR.data) or notifyChanged() can lead you down a path of producing bugs, including duplicated data.
- There is a timing bug with the databinding library and use of ViewModels, extending BaseObservable, where calling notifyPropertyChanged(int) or notifyChanged() results in no action taking place. This occurs because the OnPropertyChangedCallback hasn’t been added yet. Until the bug is fixed, consider using this temporary fix: Add an OnPropertyChangedCallback to the ViewModel for handling the corresponding action. It may help to read the generated data binding classes to better understand the problem.
- Debugging data binding build issues can be tricky. The error messages don’t provide a clear understanding as what the issues may be. Sometimes, an issue may be due to an incorrect object type passed into a binding adapter method. Other times, an issue may be caused by using data binding methods prior to setting the ViewModel.
At Phunware, we’re always working for better quality code. That means figuring out how to apply the latest technologies (such as data binding) to challenging, often high-profile projects. Interested in joining the Phamily? Check out our latest job openings and don’t forget to subscribe to our newsletter.


code base please
source, please)
Avinash and Vlad, a link to the GitHub source code has been added to the article. Thanks!
Thx, Gregory. Can you please clarify the purpose of creating viewmodel for each recyclerview item? Or this is not exactly viewmodel like we use in activity and more just like the data class?
Hi Vlad,
You’re welcome.
The purpose of creating a ViewModel for each Recycler View item view is to have ViewModels relative to the specific views in question. Following the MVVM architecture, one could follow it with having only one ViewModel for the entire view; however, I believe that would be complex and would not lend itself to be small, clean, and testable units.
Best,
Gregory