In this tutorial you will learn how to build a barcode scanner that can scan machine readable codes (QR, codabar, etc). You will also learn about the various approaches and which one might be best for your use case.
There are many ways to build a code scanner on iOS. Apple’s Vision Framework introduced additional options. We will first go over the classic tried and true method for creating a code scanner, then we will go over the new options. We will carefully consider the pros and cons for each approach.
1. The Classic Approach
Throughout the years most scanners on iOS have likely taken the following approach.
 source: Apple WWDC ’22
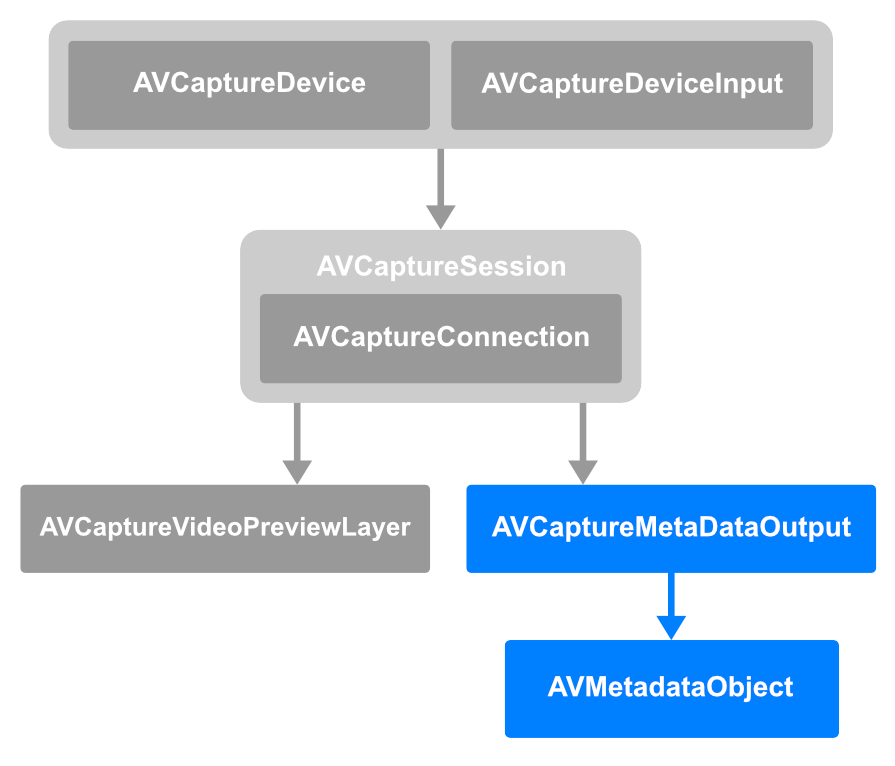
First AVFoundation is used to set up a video capture session, highlighted in gray in the diagram above. Then an AVCaptureMetaDataOutput object is hooked up to the video session’s output. AVCaptureMetaDataOutput is then set up to emit barcode information which is extracted from an AVMetadataObject (highlighted in blue).
Pros:
- When it comes to scannable code formats, there aren’t any formats that are exclusive to the newer approaches. Click here to see a full list of supported code formats.
- Minimum deployment target is iOS 6. This approach will likely accommodate any OS requirements that you may have.
- This approach is tried and true. This means there are plenty of code examples and stack overflow questions.
Cons:
- The maximum number of codes that can be scanned at a time is limited. For 1d codes we are limited to one detection at a time. For 2d codes we are limited to four detections at a time. Click here to read more.
- Unable to scan a mixture of code types. For example a barcode and a QR code can’t be scanned in one go, instead we must scan them individually.
- The lack of machine learning may cause issues when dealing with problems like a lack of focus or glare on images.
- Developers have reported issues when supporting a variety of code types on iOS 16. A solution could be to use one of the newer approaches for your users on iOS 16 and above.
2. AVFoundation and Vision
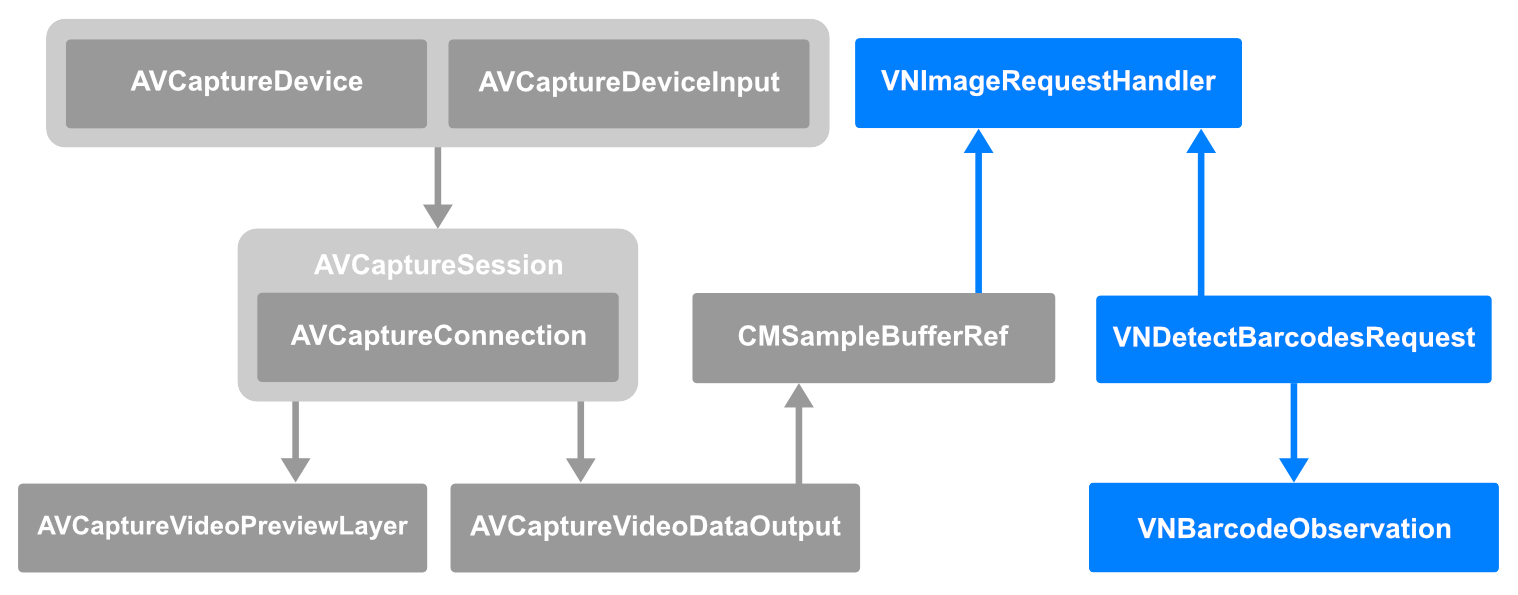
For the following approach the basic idea is to feed an image to the Vision Framework. The image is generated using an AVFoundation capture session, similar to the first approach. Click here for an example implementation.
 source: Apple WWDC ’22
Notice the three Vision Framework classes in the diagram above (in blue). The entry point to the Vision Framework is the VNImageRequestHandler class. We initialize an instance of VNImageRequestHandler using an instance of CMSampleBufferRef.
Note: VNImageRequestHandler ultimately requires an image for Vision to process. When initialized with CMSampleBufferRef the image contained within the CMSampleBufferRef is utilized. In fact there are other initialization options like CGImage, Data, and even URL. See the full list of initializers here.
VNImageRequestHandler performs a Vision request using an instance of VNDetectBarcodesRequest. VNDetectBarcodesRequest is a class that represents our barcode request and returns an array of VNBarcodeObservation objects through a closure.
We get important information from VNBarcodeObservation, for example:
- The barcode payload which is ultimately the data we are looking for.
- The symbology which helps us differentiate observations/results when scanning for various types of codes (barcode, QR, etc) simultaneously.
- The confidence score which helps us determine the accuracy of the observation/result.
In summary, it took three steps to setup Vision:
- Initialize an instance of VNImageRequestHandler.
- Use VNImageRequestHandler to perform a Vision request using an instance of VNDetectBarcodeRequest.
- Set up VNDetectBarcodeRequest to return our results, an array of VNBarcodeObservation objects.
Pros:
- Computer Vision and Machine Learning algorithms – The Vision Framework is constantly improving. In fact, at the time of writing Apple is on its third revision of the barcode detection algorithm.
- Customization – Since we are manually hooking things up we are able to customize the UI and the Vision Framework components.
- Ability to scan a mixture of code formats at once. This means we can scan multiple codes with different symbologies all at once.
Cons:
- Minimum deployment target of iOS 11, keep in mind that using the latest Vision Framework features will increase the minimum deployment target.
- Working with new technology can have its downsides. It may be hard to find tutorials, stack overflow questions, and best practices.
3. DataScannerViewController
If the second approach seemed a bit too complicated, no need to worry. Apple introduced DataScannerViewController which abstracts the core of the work we did in the second approach. Although it’s not exclusive to scannable codes, it can also scan text. This is similar to what Apple did with UIImagePickerViewController, in the sense that it’s a drop in view controller class that abstracts various common processes into a single UIViewController class. Apple provides a short article that introduces the new DataScannerViewController class and walks through the required setup and configuration.
Pros:
- Easy to use and setup.
- Low maintenance, Apple is in charge of maintaining the code.
- Can also scan text, not exclusive to machine readable codes.
Cons:
- Minimum deployment target of iOS 16.
- Only available on devices with the A12 Bionic chip and later.
- Limited control over the UI, even if the UI looks great sometimes we may require something more complex.
Conclusion
We went over the various ways to scan machine readable codes on iOS. We explored the pros and cons of each approach. Now you should be ready to use this knowledge to build or improve on a barcode scanner.
Who knows, you may even choose to take a hybrid approach in order to take advantage of the latest and greatest that Apple has to offer while gracefully downgrading for users on older iOS devices.


